The Best Tips to Help Everyone Create Great Bird Photography

The Yucatan Peninsula, Mexico. The snowy white feathers can cause your Exposure to turn too dark and require positive Exposure Compensation. Image: ©Jorn Vangoidtsenhoven
by Jorn Vangoidtsenhoven

Wildlife photographer, Jorn Vangoidtsenhoven shares his secrets for capturing bird images. Jorn is a Destination: Wildlife Team member.
GREAT NEWS! The major camera manufacturers have just announced the launch of their latest top-of-the-line technology. It's a camera that wakes up by itself at 4 AM, heads out into the field, hikes through muddy forests, and waits for the birds to land on a beautiful perch covered in perfect light, all while you are at home, warm, dry, clean, and sleeping late.
Wouldn’t that be fantastic? All kidding aside, we are so flooded with great images on social media and everywhere – from both past and present – that we think it's a piece of cake to create them: All we need to do is buy the best camera possible. Set it on 'Auto' and shoot. Right? Not exactly.
I have found that one of the most common things people say when they want to compliment your image is: "Wow, what camera did you use?" As if a better camera is the only secret to great photography.
What better place to guarantee a bird sighting as its nest? I waited at this nest until the swallow returned. Yellowstone National Park, Wyoming. Image: ©Jorn Vangoidtsenhoven
Under the right conditions, it is difficult – if not impossible – to see the difference between an image taken with your cell phone, or a $300 camera and lens, or one taken with an $18,000 camera and lens.
And creating great bird photographs has its own set of challenges. You learn very quickly that good avian photography is not just about the equipment, no matter your camera or lens.
To begin, when attempting to photograph a bird, usually all you see in your viewfinder is a tiny subject erratically fluttering around. Good camera equipment will help but don't expect it to be the end-all-be-all.
These are some of my – brand-independent – top tips for creating compelling bird images.
Tip 1: Unleash Your Passion

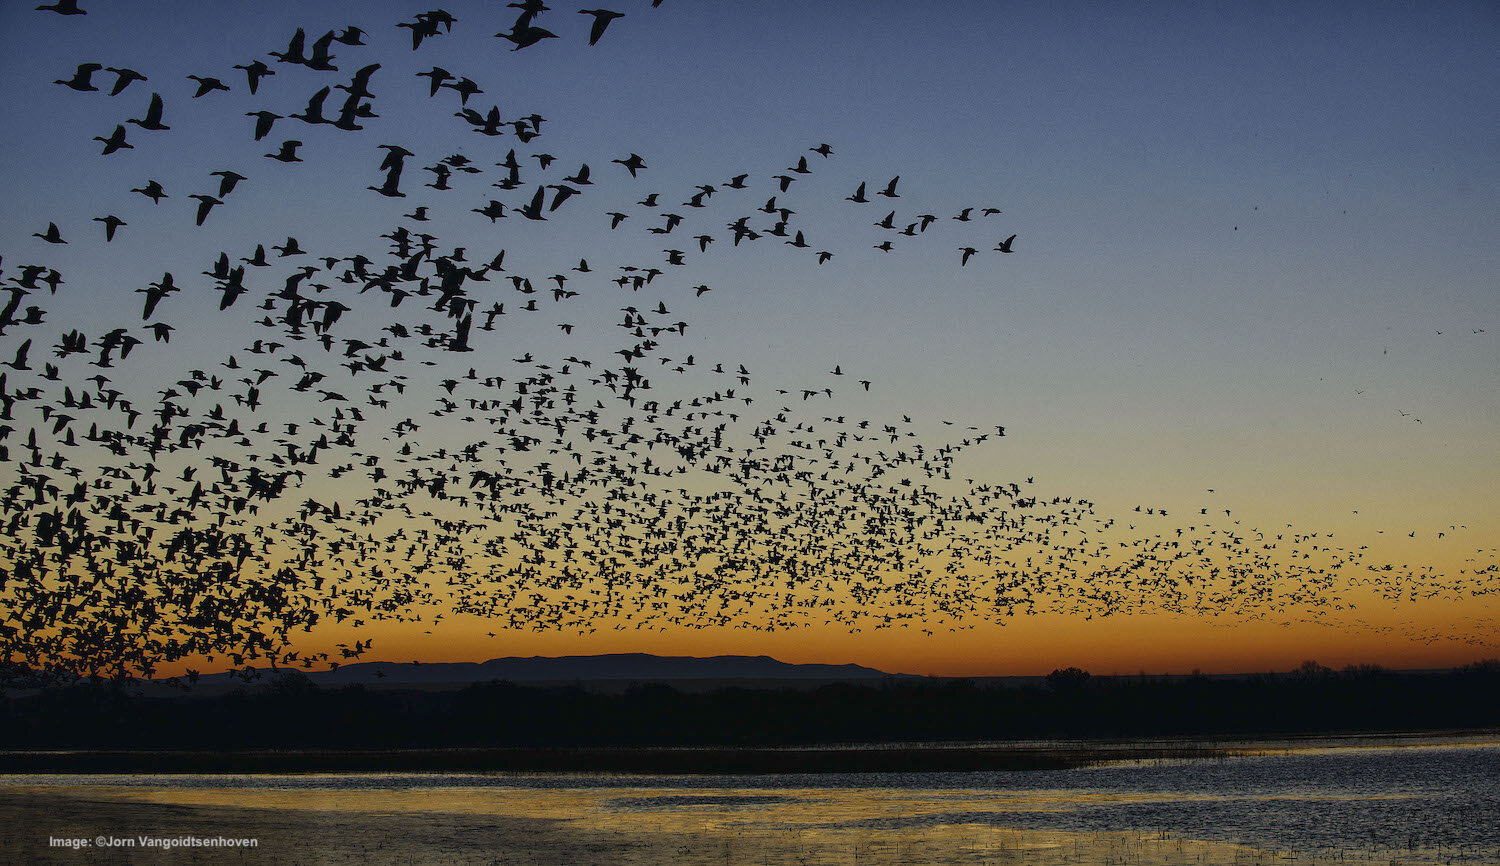
Bosque del Apache NWR, New Mexico. One of my favorite places for bird photography is Bosque del Apache, where thousands of Snow Geese and Sandhill Cranes spend the winter. Especially witnessing the morning ‘blast off’ of thousands of Snow Geese is an amazing experience. Image: ©Jorn Vangoidtsenhoven
Great wildlife photography begins and ends with passion: the passion necessary to put in the required time to get to know your equipment; and the passion that drives you to locate the subjects you love and to learn and understand their behaviors.
In birding, a great place to start locating and learning about the subjects for many of us may be our backyard.
Tip 2: Learn Bird Behavior
Sonoran Desert, Arizona. Once I found out that this saguaro cactus gets used yearly by Great Horned Owls, all that was left was to return during nesting season and wait. Image: ©Jorn Vangoidtsenhoven
I quickly learned that walking around with a camera looking for birds isn't the best method of getting consistently good bird shots.
Birds are shy and typically avoid humans at close range. If you do get an opportunity to approach one, by the time you find the bird in your viewfinder, it typically takes off!
Try this: In your backyard, set up a small blind or observe the birds from inside your home. Become familiar with where they land, what time of the day they appear, and how long they stay.
Hone your bird photography skills in your backyard. Install a bird feeder with a nearby perch and focus your lens on it. Dark-eyed junco. ( Possibly the grey-headed subspecies. Contact us if you have an idea) Image: ©Jorn Vangoidtsenhoven
Installing a feeder increases your chances of attracting birds to your backyard, and it also helps you predict their behavior.
Build a perch next to your feeder and focus your lens on it: you'll get great shots when the birds perch for a few seconds before descending to the feeder and again after they leave it. Remember to move slowly: even if partially hidden inside a blind, sudden movements spooks birds.
Tip 3: Background, Background, Background


As the old real-estate saying goes: a property's value is based on three factors: location, location, and location. Similarly, in bird photography, image success is enhanced by background, background, background.
When you build your feeder and perch – or when you are on location in nature – be extra aware of your background. If possible, position yourself so that the background behind the bird is uncluttered. A potentially clean, crisp image of a bird can quickly turn bad by a distracting cluster of branches or bright spots.
Tip 4: Catching the BIF. Shutter Speed and Aperture

Photographing a bald eagle as it flies towards you requires a large shutter speed. In this particular case, I was in a rainforest so carefully had to choose between a fast enough shutter speed and a small enough ISO. Southeastern Alaska. Image: ©Jorn Vangoidtsenhoven
Photographing birds in flight ("BIF" for short) is one of the most difficult tasks you can ask of your camera equipment. The faster the shutter speed, the better. I recommend at least 1/1000s but choose 1/2000s or faster whenever possible. For birds that are just sitting on a branch, you can go much slower.
The need for a high shutter speed goes hand-in-hand with the need for a lens with a large aperture: the larger the aperture, the better. Shoot at the maximum aperture of your lens to maximize light falling onto the sensor.
A large aperture is also a great tool to draw the viewer's eye to the subject by creating a shallow depth of field (or "bokeh"). Just make sure that the bird's eyes are in the zone of sharpness. My standard equipment for bird photography includes a 600mm f/4 lens, which almost always gets used wide open at f/4.
Tip 5: Fast Frame Rate

A burst of images allowed me to select the moment of touchdown for this Pink Flamingo. Yucatan Peninsula, Mexico. Image: ©Jorn Vangoidtsenhoven
A camera that supports a high frame rate - allows you to hold your finger on the shutter release button to take multiple images in a burst, is invaluable in bird photography. Sure, you can get lucky by taking a single picture, but the camera bodies geared towards action support a fast frame rate.
For example, Nikon's top of the line D6 DSLR camera supports 14 frames (or images) per second, as does its latest MILC (mirrorless) camera, the Z6ii. A high frame rate is advantageous. Out of the burst of images, it allows you to select the one that features the perfect wing position or pose.
Tip 6: Autofocus
Bosque del Apache NWR, New Mexico. A tricky situation for your camera’s Autofocus system as the focus has to remain on the landing bird and not jump to any of the other birds in the frame. Image: ©Jorn Vangoidtsenhoven
Choose a camera with an excellent autofocus system. Erratic, small subjects tend to test your camera's autofocus system to the maximum!
3D focus tracking works excellent on birds, in my experience. If the autofocus system isn't up to what you need, you can also switch to manual focus and then pre-focus on a specific spot, for example, the perch next to your feeder.
For autofocus, I recommend setting your camera to AF-C (Continuous). Dive into your camera menu system and set the AF-C Priority Selection to "Release." That ensures the camera will make the image when you press the shutter release button, and it will not necessarily wait until it has acquired focus. The reason is that the available DOF may still get the bird in the zone of sharpness, but it won't slow down the camera.
Tip 7: Image Composition
I placed the Great Grey Owl off-center to allow for fall colors in the image. Grand Teton NP, Wyoming. Image: ©Jorn Vangoidtsenhoven
Avoid placing your bird subject dead center in your composition. If you have the chance to compose the scene in your viewfinder – which is a luxury when it comes to birds that rarely sit still for long – the rule of thirds is a good starting point.
Divide the picture area into nine sections by drawing two (imaginary) horizontal and two vertical lines in the frame. The rule states that placing the subject at one of the intersections ("thirds") will be most pleasing to the eye. Many camera bodies support adding these lines into your viewfinder to help you compose your image.
That perch or feeder you built is a great tool to help gain control over the composition. You can pre-compose your image, and then all you'll have to do is wait for the birds to arrive – and shoot! Ahhh- If only it were that simple - but at least it significantly increases your chances.
Tip 8: Exposure (Compensation)

How does your camera's built-in exposure meter accomplish the seemingly magical feat of detecting the appropriate combination of shutter speed, aperture, and ISO, when you point your lens at a scene?
A camera's exposure meter measures the light that gets reflected from the scene. It assumes that the scene is what is called 18% or "middle" grey, like a green lawn. The problem is that not all objects reflect the same amount of light, so how does the camera handle this?
If an object isn't 18% grey, for example, a White Heron or a black Crow, the resulting picture's exposure will be off. The White Heron will be turned ia muddy 18% grey as will the black crow.
Exposure Compensation is a feature on your camera that allows you to override the exposure system manually.
Dial-in positive exposure compensation to make the White Heron white in your image, or negative exposure compensation to keep the black crow black.
Tip 9: Full Frame or Crop Sensor?

Having a full frame sensor allowed me to fit the entire bird into the frame. Had I been using a crop sensor, I would have had to physically walk back; something that is not always possible without disturbing the bird. Chiapas, Mexico. Cattle Egret. Image: ©Jorn Vangoidtsenhoven
No, you don't need a – typically more expensive – full-frame camera body.
A camera with a cropped sensor comes in extra handy when capturing small birds. Even with an 800mm lens, you'd be amazed at how little the bird subjects become when looking at them through a viewfinder.
That said, the full-frame sensor will be better at handling the high ISOs you'll sometimes require to keep the shutter speed fast enough. I typically set my camera to "Auto ISO" with a minimum shutter speed for all of my wildlife photography.
Bonus: Four More Quick Photography Tips
While waiting for grizzly bears along a salmon filled creek, I got lucky when this Yellow Warbler landed next to me. Image: ©Jorn Vangoidtsenhoven
- Use a tripod with a gimbal head. It allows for maximum support and flexibility to point your lens in all directions at the push of a finger. Very handy to have when your subject behaves as erratically as most birds!
- Shoot in the RAW format. It gives you the ability to fix many exposure issues during post-processing. Small birds that fly in and out of the shadows are not ideal subjects for manual exposure.
- Consider using fill flash on your camera or a reflector. Birds often hang out in shaded areas (under branches or foliage) so try to brighten those areas.
- On cloudy days, be careful shooting birds in flight against bright white clouds. It will throw off your camera's compensation, and positive exposure compensation may be what is needed. Shooting in RAW will also allow you to brighten the image during post-processing when necessary.
Conclusion
Bird photography can be extremely challenging and extremely rewarding. Don't get discouraged. Getting great bird images requires getting to know how to operate your camera, but you also have to learn as much as possible about your subject (its behavior, the best times of the day and year to find them).
The Secret Ingredient of Great Birding Photography
And finally, remember most wildlife photographers consider birds to be the most challenging subjects. So hang in there. Practice, practice, practice! And remember to have fun – it will show in your pictures.
If you are interested in learning more about how your camera works or which equipment and settings are best for bird and wildlife photography, check out my book: Beginner's Guide to Bird and Wildlife Photography Or subscribe for updates on my photography workshops, which will kick off once COVID allows it.
FOLLOW US
MORE
Great Wildlife Photography. A Pro Shares How to Get Started
By Jorn Vangoidtsenhoven
What Inspires A Wildlife Photographer? An Interview with Jorn Vangoidtsenhoven
Sea Wolf! On a Secret Stretch of the Pacific Coast Lives the Elusive Fish-eating Sea Wolf
By. Jorn Vangoidtsenhoven